This pattern was meant for chunky weight yarn and something larger than size 6 needles, but that was what I had. The pattern also called for cotton or a cotton-bamboo blend, but all that Jo-Ann and Walmart have is acrylic or wool blends. Does anyone know where I can get better yarn?
This was modified from a pattern I found on Ravelry.
Cast on 24 stitches.
Knit 6 rows.
{Purl 1 row.
Knit 5
rows.} x 5
Knit 1 row.
Bind off.
The reason the rows are so crooked is because I'm getting used to a new way of knitting. Up until now, I've been cheating when I knit and purl. I've been using my left hand to wrap the yarn around the right needle, which means I let go of the left needle for a moment. It means my rows have been tight and straight but this is just a hack. I'm not going to get any faster that way.
For the moment, knitting the correct way is awkward and a bit painful but it is getting better. My rows are getting looser too.
Tuesday, May 29, 2012
Monday, May 28, 2012
The Quilting Kit - Master Post
The Potholder
Piecing the Potholder - May 15, 2012
Quilting the Potholder - May 18, 2012
Finishing the Edges of the Potholder - May 22, 2012
Finishing the Potholder - May 26, 2012
Piecing the Potholder - May 15, 2012
Quilting the Potholder - May 18, 2012
Finishing the Edges of the Potholder - May 22, 2012
Finishing the Potholder - May 26, 2012
Saturday, May 26, 2012
Finishing the Potholder
The only thing left to do on the potholder was to finish the strap on one corner. This turned out to be the simplest part.
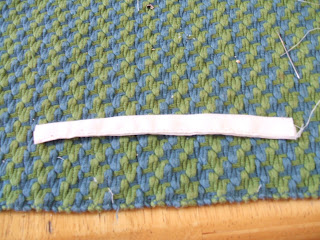
I took a scrap of muslin about 1.5 inches by 4 inches and folded the short ends toward the middle. I then folded the scrap over on itself to hide the raw edges and backstitched along the open end. My stitches were pretty even too.
I then matched the remaining raw edges together, folded them under and stitched that bit to the back of one of the corners.
Pretty simple! Though not due to the directions. Still, that's one project down and two to go.
Unfortunately, I won't be able to get to the other two projects for another three months or so.
Tuesday, May 22, 2012
Finishing the Edges of the Potholder
With the potholder quilted, it is time to finish the edges. The directions say to fold the edges of the muslin over twice and pin, then sew as in the diagram below.
I don't understand. I don't. What is that suppose to be? Zigzag? This has to be one of the most non-intuitive list of directions I have ever seen. I ended up using the backstitch again.
The edges are sticking out because of course the directions have nothing on mitering edges or even where to stitch. I sewed along the inner edge.
I just don't understand this package at all.
Friday, May 18, 2012
Quilting the Potholder
With the face of the potholder pieced together, it was time to do the actual quilting.
...Which means "stitching next to the seams with an up and down motion".
Yeah. I'm not sure what that means either. I have an idea, but these directions are really bad.
Anyway.
I lined up a 9x9 square of muslin, a slide of batting, and the pieced face.
I then basted around the edges.
It's rather hard to see, but I just ran two lines of very short basting stitches along the diagonals. My stitches were very crooked and irregular at the beginning but they started looking better about a quarter of the way through.
This is the pinning for finishing the edges. Again, the instructions are very lackluster.
...Which means "stitching next to the seams with an up and down motion".
Yeah. I'm not sure what that means either. I have an idea, but these directions are really bad.
Anyway.
I lined up a 9x9 square of muslin, a slide of batting, and the pieced face.
It's rather hard to see, but I just ran two lines of very short basting stitches along the diagonals. My stitches were very crooked and irregular at the beginning but they started looking better about a quarter of the way through.
It is easier to see the stitches on the back.
This is the pinning for finishing the edges. Again, the instructions are very lackluster.
Tuesday, May 15, 2012
Piecing the Potholder
This week I have started on the quilting package.
Upon opening it, I discovered that there were only 6 5x5 squares when there should have been 7. I need 7. Lucky for me, I have scraps from other projects but that is not a good way to start the project.
The first project is a potholder. I picked two squares and cut them along the diagonal to form four triangles.
The sad part about this is that the instructions say how to cut squares into triangles but not how to sew them together. I used the backstitch.
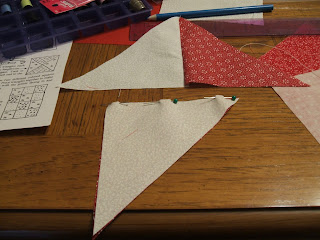
I pinned and stitched one red triangle and one white triangle along one of the shorter sides, right sides together.
You cannot see it well but my stitches are irregular and crooked in the first few pictures. I got better later on.
I did the same for the remaining triangles.
Now with two larger triangles, I pinned and sewed along the edge. This formed the pieced section of the potholder.
Upon opening it, I discovered that there were only 6 5x5 squares when there should have been 7. I need 7. Lucky for me, I have scraps from other projects but that is not a good way to start the project.
The sad part about this is that the instructions say how to cut squares into triangles but not how to sew them together. I used the backstitch.
I pinned and stitched one red triangle and one white triangle along one of the shorter sides, right sides together.
You cannot see it well but my stitches are irregular and crooked in the first few pictures. I got better later on.
I did the same for the remaining triangles.
Now with two larger triangles, I pinned and sewed along the edge. This formed the pieced section of the potholder.
Friday, May 11, 2012
End of Spring Semester Round-Up
The spring semester is over and I'm back home!
It's time to take stock of what I've started, what I've finished, and what I am still working on.
In 2012 I started:
The Hummingbird Cross Stitch
The Pink Scarf
The Lambda Plushie
The Cavalier Hat
The William and Mary Fringed Fleece Blanket
The Felt Hat
The Straw Hat
The Washcloth Doll
The Felt Cavalier Hat
Total: 9
So far I have finished:
The Hummingbird Cross Stitch
The White Scarf
The Lambda Plushie
The Cavalier Hat
The William and Mary Fringed Fleece Blanket
The Felt Hat
The Straw Hat
The Washcloth Doll
The Felt Cavalier Hat
Total: 9
I still need to finished:
Things undone from 2011
The Pink Scarf
This shows that I have at least been keeping up with my projects; I started and finished the same number of projects. I have also focused more on non-knitting things, though the hats account for less than half of the total finished.
All in all, it has been a good semester.
Thursday, May 10, 2012
The Buckram Cavalier Hat - Master Post
Flat Patterning the Cavalier Hat - February 10, 2012
The Buckram Foundation - February 27, 2012
The Crown - April 17, 2012
Crown and Brim - April 24, 2012
Trimming the Cavalier Hat - May 1, 2012
Tuesday, May 8, 2012
Upcoming Project - Quilting
It's the last week of finals; in two day's time I will be home. I didn't want to start a new project only to pack it up again.
This is what I will be starting soon:
This kit theoretically contains enough material to make a potholder, a small pillow, and a doll blanket. I've wanted to learn to quilt for a few years now, so it's nice to start with something small.
This is what I will be starting soon:
This kit theoretically contains enough material to make a potholder, a small pillow, and a doll blanket. I've wanted to learn to quilt for a few years now, so it's nice to start with something small.
Friday, May 4, 2012
The Millinery Tea Party
On Tuesday I had my Millinery class final. We brought in all four of our hats to be photographed and then we went out to tea.
Of course, we had to wear one of our hats to tea. We were also suppose to dress to the hat. Here are two of my friends with their hats:
At tea:
This is what the hat looks like when it is on my head:
And of course, I was frequently told: Nice hat!
Mission Accomplished.
This is me posing with all of my hats:
This is what the hat looks like when it is on my head:
And of course, I was frequently told: Nice hat!
Mission Accomplished.
Subscribe to:
Comments (Atom)


